

Sunday, June 5, 2016
Stanley Garage Door Opener Repair and Replacement Parts from Star Door Parts
Wednesday, June 1, 2016
To Kick-off National Garage Door Safety Month we Want to Share our Garage Safety and Secuirty Tips
One of the
top mistakes people make is leaving the garage door remote in their
vehicle. Thieves break into your car and take the remote giving them
direct access to your home. The best way to prevent this from happening
and still have easy access to your garage door opener is to simply
purchase a key-chain style remote.
Keep GPS devices stowed away when parking at shopping malls, movie theaters or sporting events. Criminals will break into your car steal your GPS and your garage door remote control and then hit the “home” button on the GPS and it leads them to your unoccupied home where they will have access for several hours while you are enjoying your entertainment. If your transmitter does get stolen be sure to immediately clear all the codes in your opener and reprogram all your remotes and keypads. This prevents that stolen device from opening your door. If you do not know how to clear your codes please contact the door opener manufacturer for assistance.
Secure your garage door emergency release mechanism by using a zip tie or product designed to prevent the “six second” break-in. Products like the no-entry latch guard are easy to install and are typically under $20 and make this break-in technique almost impossible. Criminals will use a wedge and coat hanger to grab the disconnect mechanism on your garage door opener and can be in your garage (and house if your door to your house is unlocked) in seconds.
Keep the door locked between your garage and house. We suggest using a deadbolt. Also make sure the door from the garage to your home is as sturdy as your front door. A steel door is the best and anti kick devices are also recommended. It really is not that big of an inconvenience to unlock the door when you consider the piece of mind you will have knowing your home is safe. Another helpful hint is to install a good wide-angle peephole to look into your garage from safely inside the house in case you do hear strange noises coming from your garage.
Do not make it easy on the criminals and forget to shut your door when you go to bed or leave for work. This gives them free access to anything in your garage and if they shut your door behind them plenty of time to also break into your house without being seen. There are a couple products on the market like a garage door monitor that can tell you if your garage door is open or closed from your bedside or anywhere in your home. Genie now has a garage door opener that can be fitted with a device called a closed confirm remote that will tell you if your garage door closed properly behind you.
If you do have windows in garage door or side windows in your garage be sure to get obscure glass or frosted glass to prevent thieves from looking in to see what good stuff you have to offer or more importantly if someone may be home or not. Keep expensive items like golf clubs, bikes and power tools out of site. These are items easy to sell and pawn.
Always padlock the slide lock on your door when traveling or away from your home for long periods of time. If you do not have a slide lock on your garage door they can be purchased for under $10 from a hardware store or online garage door parts retailer. This ensures no one will be able to open your garage door manually or with a remote. This will give you a piece of mind that your garage is secured while traveling. A little tip though be sure to either unplug your opener or turn the vacation switch on your wall station to prevent you from accidentally pressing the button when you return home and damage your door, opener or both due to it being locked down.
Making sure your garage door and opener are maintained properly and installed correctly is also an important part of the security of your home. The draw bar arm that connects your garage door to your door opener should be as close to vertical when the door is closed and sealing the door at the floor. This helps prevent someone from prying your garage door open. If your drawbar arm is angled it can be back driven in some cases allowing access to your door. Be sure to keep the area around your photo safety sensors clean and free from debris. This is the reason most doors do not close when you activated.
Click here to see all our safety and security products.
Thursday, May 26, 2016
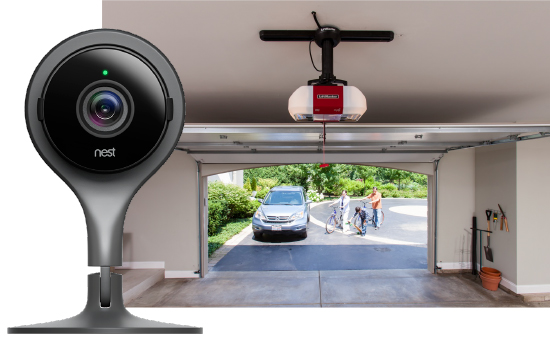
LiftMaster Now a Partner with Nest to Bring a Camera to the MyQ System
If you house is like most others, the garage is the main entrance to your home for your whole family. Users of the LiftMaster MyQ system have come to appreciate that the MyQ app (a free download at the App Store for Apple phones and at Google Play for Android phones) has always alerted
users to garage door activity via smart phone push notifications. But did you know who opened the garage door? Now that has all changed! With this new partnership, you can purchase and install a
Nest Cam in the garage and can view a live video feed from the
garage, or any other room, and receive notifications when motion is
detected, all from the MyQ app.
MyQ lets you keep an eye on coming and going activities of your home, and with the Nest Cam you can easily and conveniently see what’s happening at home when you’re not there. Through account linking MyQ and Nest Cam bring added safety, security and peace of mind to your family – from anywhere. Great for people with valuable items in the garage, families with kids who may be home alone, or those who travel frequently.
MyQ lets you keep an eye on coming and going activities of your home, and with the Nest Cam you can easily and conveniently see what’s happening at home when you’re not there. Through account linking MyQ and Nest Cam bring added safety, security and peace of mind to your family – from anywhere. Great for people with valuable items in the garage, families with kids who may be home alone, or those who travel frequently.
Sunday, May 15, 2016
How to Replace a Garage Door Opener Drive Belt
Removing the Existing Belt
1.
Begin by disconnecting the power to the garage door opener and battery back-up power
(if applicable). Caution: Failure to do
so could result in serious injury.
2.
Disengage the outer trolley by pulling the emergency release rope.
3.
Manually pull the garage door to a closed position.
4.
Relax the belt tension by loosening the outer nut on the trolley threaded rod.
5.
Remove belt cap retainer and then remove the belt from the sprocket and
trolley.
6.
Manually slide the inner trolley to the closed position until it engages the
outer trolley.
7.
Reconnect power to garage door opener.
8.
Using a remote control, run your opener until the sprocket completes a
clockwise cycle.
9.
Remove power to garage door opener before proceeding.
NOTE:
The above steps should have placed the trolley in the down position with the
door closed thereby ensuring the trolley is in the correct position for the new
belt.
Installing the New Belt
1.
Pull the belt around the pulley and towards the trolley. The ribbed side must
contact the pulley.
2.
Hook the trolley connector into the retaining slot on the trolley.
3.
Dispense the remainder of the belt along the rail towards the power head,
around the sprocket and towards the trolley.
NOTE:
Replacement belts manufactured on or after November 1, 2012 include a Spring
Retainer Plate assembly and a threaded rod attached at one end of the belt. If
you have a new design belt, please follow the instructions in the Spring
Retainer Plate section. For earlier replacement belts please follow the
instructions in the Spring Capsule section.
Spring Retainer Plate - Operators built
on or after November, 2012
1.
Remove the outer nut from the trolley threaded rod.
2.
Insert the trolley threaded shaft through the hole in the trolley. Important: Make sure that the belt is not
twisted.
3.
Install the outer nut and hand tighten.
4.
Pull the red release rope to disengage the trolley.
5.
Spin the inner nut and lock washer down the trolley threaded shaft. Use a
1/2" wrench and tighten the outer nut until the line on the spring
retainer plate is visible.
6.
Tighten inner nut to secure the adjustment.
7.
Reconnect power to your garage door opener and refer to your Owner’s manual on
how to set your model garage door opener’s travel and force adjustments
(located on the power head).
Spring Capsule – Garage door Openers
Built Before November 2012
1.
Remove from the old belt, threaded rod, spring capsule, square nut and master
link. Install only the threaded rod and master link on the new belt. If using a
D-Shape threaded shaft, make sure it is on the new belt correctly.
2.
Insert the trolley threaded shaft through the hole in the trolley. Important:
Make sure that the belt is not twisted.
3.
Place the spring, then the square shaped nut on the threaded rod and hand
tighten.
4.
Pull the red release rope to disengage the trolley.
5.
Use a 7/16” open ended wrench on the square end to tighten until spring tension
is properly set. When properly set, the
spring should measure 1-1/4" in overall length.
6.
Reconnect power to your garage door opener and refer to your Owner’s manual on
how to set your model garage door opener’s travel and force adjustments
(located on the power head).

Saturday, May 14, 2016
Need a New LiftMaster, Sears Craftsman or Chamberlain Remote?
Do you have a LiftMaster, Sears Craftsman or Chamberlain garage door opener and need to buy a new remote but not sure which one you need? All LiftMaster and Sears Craftsman garage door opener are made by the Chamberlain Corporation. These garage door openers share the same technology making the remote controls and wireless keypads interchangeable between these three brands. However, you need to know what frequency your garage door operates on in order to select the correct remote or keypad for your specific opener.
The easiest way to determine the correct replacement remote or keypad is to know your frequency. The three frequencies used since 1993 is 310, 315, and 390 MHz. If you don't know the frequency of your garage door opener you easily determine this based on the "learn" button on the power head of the opener. This button, sometimes also referred to as the "programming" or "smart" button, is usually a colored square button (but also can be a circular button on newer models). Square buttons will be green, red/orange or purple and circular buttons will be yellow.
This is an example of the purple and red/orange learn buttons:

You can determine your garage door opener's frequency based on the color of these buttons as follows:
Click here to see all the LiftMaster, Sears Craftsman and Chamberlain Remotes Sold by Star Door Parts
The easiest way to determine the correct replacement remote or keypad is to know your frequency. The three frequencies used since 1993 is 310, 315, and 390 MHz. If you don't know the frequency of your garage door opener you easily determine this based on the "learn" button on the power head of the opener. This button, sometimes also referred to as the "programming" or "smart" button, is usually a colored square button (but also can be a circular button on newer models). Square buttons will be green, red/orange or purple and circular buttons will be yellow.
This is an example of the purple and red/orange learn buttons:

You can determine your garage door opener's frequency based on the color of these buttons as follows:
- Green Square Learn Button 390MHz Billion code garage door openers made from 1993 to 1995
- Red/Orange Square Learn Button 390MHz Security+ garage door openers made from 1996 to 2005
- Purple Square Learn Button 315MHz Security+ garage door openers made from 2006 to 2014
- Yellow Round Learn Button 310, 315 and 390MHz Security+2.0™ garage door openers made from 2011 to current
Click here to see all the LiftMaster, Sears Craftsman and Chamberlain Remotes Sold by Star Door Parts
Tuesday, May 10, 2016
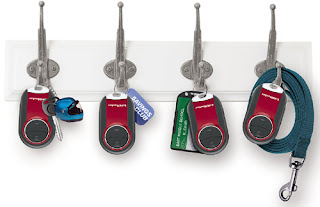
Check out the newest universal garage door opener mini remote control from LiftMaster!
The new LiftMaster
374UT Universal Mini Garage Door Opener Remote Control is portable,
compact and durable and works with most all major brands of garage door
openers. Perfect for key rings, purses and backpacks. Give one to
everyone in your house and never have to deal with the hassle of lost
keys!
Click the link below to see why everyone is talking about this new remote. Order yours today at Star Door Parts!
Click here to read more about the new LiftMaster 374UT Mini Remote

Click the link below to see why everyone is talking about this new remote. Order yours today at Star Door Parts!
Click here to read more about the new LiftMaster 374UT Mini Remote


Tuesday, May 3, 2016
Add curb appeal instantly to your home!
Now that spring is here, don't forget to spruce up the curb appeal of your house by adding decorative hardware to your garage doors. With the magnetic decorative hardware sold by Star Door Parts, you can quickly and easily transform your plan steel garage door into a carriage look garage door! There is no drilling or screws needed and our products will not rust or fade. Check out our fully selection of magnetic hardware today! Don't forget to check our discounts page to see how we can save you even more this spring!

Star Door Parts Magnetic Decorative Hardware

Star Door Parts Magnetic Decorative Hardware
Subscribe to:
Posts (Atom)