Problem: The screws connecting a garage door opener to the garage door can
come loose over time, making the garage door unable to raise or lower.
Quick Fix: To fix this problem, simply replace the missing or loose screws with slightly
larger diameter self-tapping sheet metal screws. Install one or more
extra screws using the self-tapping feature on the screws and an
electric drill to drill holes through the bracket and garage door frame.

Sunday, July 28, 2019
Monday, July 1, 2019
How to Stain Your Garage Door
Natural
wood garage doors give an enhanced appearance to any home. To keep your wood garage doors looking good, it is important to stain and seal them on a regular basis. Doing this
protects the wood doors from the weather and enhances their
beauty. Here are a few steps to keep your wood garage doors looking their best:
1. Start by Cleaning
You'll want to begin by cleaning the garage door. Always use a good quality wood-cleaning product. Dust, dirt, moss and mildew are the most common things that you will find on wood that’s exposed to the elements which will ruin the look of the garage door. Sun damage in warmer states will also take a heavy toll on wood. A water pressure washer can be used on most wood doors but low water pressure, 1000-1500 psi or less, is recommended. Too much pressure can damage the door. We also recommend using a wood cleaner to remove stains and all types of dirt and residue. Be careful not to damage to the surface of the garage doors' surface when doing this.2. Allow Drying Time
Once you have cleaned the wood garage door, make sure that it is completely dry. It is recommended that you wait at least 24 hours or more for the wood to completely dry out. If you are using an oil-based stain, it will bead on moist wood. And if you are using a water-based stains it will not apply evenly while the wood is still wet.3. Make Sure to Apply a Quality Stain
Don't go with a cheaper stain since it will not look at good and will not hold up as well to the elements. We recommend using a penetrating oil-based wood stain. You can use a roller brush or a sprayer. Typically you only need one coat of stain. Using a technique called back brushing, helps the stain to get into the wood’s surface evenly and deeply creating an even and consistent look. This must be done quickly and before the stain begins to dry otherwise the stain will be too viscous and will cause blotches and an uneven look. Be sure to only apply a second coat after the first coat has dried for at least a day. Since stain tends to fade over time, you can refresh it by washing the wood with wood cleaner and then re-coating. If you want a glossy look, we recommend going over the finished wood with an exterior varnish or polyurethane.Sunday, December 9, 2018
How to Help Keep Your Garage Warm in the Winter
During the winter, your garage becomes one of the coldest places in your house. Whether you also use your garage for storage or a workspace, you can’t get fully comfortable until you can properly heat your garage in winter. Household garages are high-traffic areas, with many family members passing through to collect bikes, perform DIY projects and access their vehicles. But wintry weather can make these experiences less than enjoyable by turning your garage into a bitterly cold area that you will want to avoid at all costs. Not only that, but the harsh temperatures can potentially cause damage to equipment stored in this space. Stay toasty and warm throughout the chilly season with Garage Heating 101 – our tips to keep your garage warm this winter:Install a Garage Heater
An obvious choice for warming up a space is to install a heater. The decision you need to make is whether to opt for gas or electric, both of which have their pros and cons. Gas heaters are cheaper but require a gas supply and exhaust venting. Electric heaters are pricier but boast an easier installation.To guarantee a safe fitting, heaters are best installed by a trained professional, who can also advise as to what model could suit your garage best. But beware; heaters are a wasted addition if your garage is not kitted out with decent insulation, as the heat energy will simply conduct through the walls and floor and disappear. We have many articles on our Pinterest page to help with this task.
Insulate the Garage Door
Simply put, heat conducts through solid surfaces and this includes your garage door. By fitting your garage door with insulating materials is a great way to help the heat stay in your garage. A variety of materials are available for this purpose, including foam boards and fiberglass batt insulation. Whatever materials you choose, make sure that it’s applied with a snug and secure fit. We have many articles on our Pinterest page to help with this simple DIY task.Insulate the Garage Walls
Don’t just insulate your door and neglect your walls. This huge surface area is capable of conducting energy, letting it escape from your garage and making temperatures inside plummet to uncomfortable levels. Treating your walls to some insulation can work wonders in raising the temperature, especially when combined with the presence of a heater. There are a few insulation options available to homeowners; a trusted professional should be able to help you with your selection if you’re unsure.You should also take note that insulation is only effective if it’s installed snugly and securely. We have many articles on our Pinterest page to help with this DIY task.
Repair Or Replace the Weatherstripping and Threshold
Insulate your garage against draughts by repairing or replacing your garage’s weatherstripping and bottom seal or threshold. Both of create a seal between the garage and the garage door opening, keeping it weather-tight. Over time, these valuable components can become cracked and shrink, allowing cold air to escape through. Replacement can help insulate your garage from not only cold air but also water and other debris that make come in underneath the garage door. Star Door Parts sells a variety of garage door threshold for all types and sizes of garage doors. We also have provided several DIY How To articles on our webpage and Pinterest page to show you step by step how to easily and quickly tackle this job.Consider Caulking
Surface gaps and cracks occur over time and are one of the biggest losses of energy efficiency. Caulking means using a proper caulk or sealant and application gun to fill in any gaps and cracks around windows, garage doors, moldings and other areas where gaps can appear. As a rule of thumb, caulk any area where two dissimilar materials meet (e.g., brick and wood, siding and wood, stucco and wood, etc.). Before caulking, be sure to clean the area and make sure it’s dry to prevent moisture from being sealed in. You can use silicone caulk for many years of reliable performance.Sunday, May 20, 2018
How to Determine the Cable Length for Your Garage Door
How to Determine the Cable Length for Your Garage Door
Use
the steps below to determine your correct replacement cable length for
your garage door cables (for doors using torsion springs only).
You will need to determine some of the following information before you begin!
1. Identify the manufacturer and part number of your cable drum
2. Calculate the distance from the floor to the center line of the garage door spring torsion shaft.
3. Calculate the amount of high lift your garage door has (if applicable) by using one of the following methods:
(a) To
determine amount of high lift you can measure from floor to center line
of shaft in inches and then subtract the door height in inches and subtract
an additional 6 ½” for a 2” track or subtract 7 ½” for a 3” track. The
total remainder will equal your high lift amount; or
(b) Measure
from the floor to the bottom of your horizontal garage door track in
inches then subtract your door height and the total remainder is the
high lift amount.
The above information is only a basic reference point. Always use precautions when replacing garage door cables. It is recommended that these repairs only be done by trained professionals.
Monday, November 13, 2017
Door Counter-balance and Cable/Bottom Bracket Inspection
-->
Fall is here in Minnesota and we know
what's coming next....Winter!
Here is the first in a series of garage
door inspections that you can easily do to prepare your garage door and opener
for the long winter ahead.
How
to Perform a Garage Door Spring Test
DO NOT RELEASE the garage door opener
safety release with the door in the open position. If a spring is broken or
severely out of adjustment, the door could fall causing death or severe injury.
Caution:
If you are the least bit unsure, or do not understand this procedure, please,
contact a professional garage door service to inspect your door.
First, with the garage door in the
completely CLOSED position, release the garage door opener safety release.
Next, raise the garage door manually,
so that the bottom of the door is in the middle of the opening. Be sure the
path from the door bottom to the floor is clear, (children, pets, feet, hands,
objects, etc.). The door should raise with little effort and stay positioned in
the mid- open position. If the door goes
down with any amount of force, falling, or heavy, your spring system is out of
adjustment and needs to be addressed.
All garage door spring systems have a
life cycle, typically 5,000- 10,000 cycles, and begin to wear as soon as they
are put in to use. Because 95% of garage doors have openers on them, we do not
notice when the spring goes out of adjustment, causing undue wear and damage to
the opener.
My older brother called me late one
evening to say that he was at his son's house because they could not get the
garage door to close properly. The opener was making a grinding
noise & the door kept going back up. He wanted to know if I could help him
trouble shoot the problem over the phone from 100 miles away. I said sure, I'll
help.
With the advent of smart phone
technology and a few questions, I was able to determine that the door was 10
years old, and that the spring was so severely out of adjustment, that the top
two feet of door close travel was completed only by the opener and not the
torsion spring! Garage door openers were never designed to open or close doors
with out the spring counterbalance assistance.
Well, eventually, the door
"dumped" the cables, and they had become tangled and bound on the
cable drums the door couldn't move. I might add that this was a monster of a
door - 16’x8’ with windows, and a pair of 2" x .283 x 41" torsion
springs. The door weighed about 400 pounds!
We determined that this door was
going nowhere and that the services of a professional door technician was
needed, the door stayed open that night since daylight was needed to properly
access the situation and wait for the technician.
I explained to my brother that what we
needed to do was to get the cables untangled on the cable drums, and to do that
in the dark with no experience and less than ideal circumstances was almost a
guaranteed hand/finger amputation.
He called Pete Hawkins, the owner of
Hawkins Overhead Door of Wabasha, Minnesota, www.hawkinsoverheaddoor.com, who
came right over the next morning and replaced the cables and properly adjusted
the garage door torsion springs.
Thank you for your prompt and
professional service Pete!
Saturday, May 20, 2017
Saturday, August 27, 2016
How to Remove and Install Garage Door Weather Seal
-->


SAFETY FIRST! Be very careful around the garage door. It’s
one of the heaviest moving objects on your house and can inflict serious or
even deadly injury and harm to people, pets and objects in and around the
garage.
Getting Started
Start by placing all of the necessary
tools outside of the garage (on the driveway, etc.) because you will
need to close the garage door when you begin the weather seal removal and installation
process.
Recommended Tools Needed:
·
Safety glasses and work gloves
·
Utility knife with a NEW, sharp blade
·
Tape measure
·
Vice Grips and/or locking pliers or clamps
·
Pencil
·
Drill and a 1/16” drill bit
·
New garage door weather seal (available at www.stardoorparts.com)
·
Utility Shears or other means to cut the weather
seal
·
Hammer
·
Nails
·
Caulk gun
·
Caulk (we suggest using one that is paintable so
you can match it to the color of your house or garage door)
·
Clean cloth
·
Household spray cleaner (such as 409)
·
An Assistant!
Removal of the Old Weather Seal
1.
Start by closing the garage door and unplugging
the garage door opener from the power source. Also, if your opener is equipped
with an emergency operator trolley release (usually a red T-style pull handle
on a rope connected to the trolley), be sure to pull the release to disengage
the trolley from the track and manually raise the garage door to the open
position. We have found that it is easier
to work on the weather seal with the garage door in an open position. To do this hold the garage door where you
desire it to stay and use a locking pliers (Vise Grips) and clamp it to the
garage door track.
Tip: Be sure to
position the locking clamp below the bottom roller so that the door cannot
close on you if the torsion spring tension happens to be out of adjustment.
This is a very common issue and the tension should be adjusted annually only by
a trained professional.
2.
To begin removal of the old weather seal, (with
the garage door in an open position), choose a side and take a sharp utility
knife (with a NEW blade) and make a clean score at the joint between the weather
seal body (wood, aluminum, PVC, or vinyl) and the garage door jamb (see photo). This will allow you to remove the old weather
seal with out damaging the finish on the garage door jamb.

3.
Using a rigid, steel putty knife, firmly push
between the old weather seal and the garage door jamb. With a gentle prying
motion, loosen the weather seal from the door jamb. Now you will be able to use
a flat bar (pry bar) inserted in the gap to finish removing the seal and nails.

Tip: You may
want to place a small piece of sheet metal or a putty knife under the pry bar
to prevent damaging the finished garage door jamb (see photos).


4.
Repeat this process for the remaining top and
side pieces of weather seal.
5.
With all of the weather seal and fasteners
removed from the garage door jambs, take this opportunity to remove any debris
and ridges of paint. We also suggest cleaning
the door jambs with a clean cloth and some household spray cleaner (like 409 or
a similar product that cut remove dirt and grease).
Installation of New Weather Seal
1.
Start by using a tape measure to measure the
length of the inside of the top garage door jamb, side-to-side at the top,
where the top piece of garage door weather seal will be installed first (see
photos).
Tip: This step is done much easier with two
people.


2. Use
a utility shears to cut the new, replacement weather seal pieces to length (be
sure to first check the fit and adjust as needed and re-measure BEFORE cutting!).
Tip:
You can use utility shears, a hand or electric hand saw with a fine
tooth blade (placed in a miter box based on type of saw used), an angle grinder
with a 3/32” cutoff wheel, or a multi-tool with a fine tooth blade or saw.
There are many options to choose from here, just remember to utilize ALL SAFETY
MEASURES regarding eye wear, hearing protection, gloves, etc.
3. After
you have determined the placement of the new, cut weather seal, we recommend
drilling small pilot holes for the nails.
We have found that it is easier to drill a small pilot hole (slightly
smaller than the diameter of the nail you will use) centered in the width of
the new weather seal, 1 inch from each end and then in 8” – 12” inch intervals
for the entire length of weather seal.
This eliminates the need to try to pound the nails in while in an upside
down position (see photo).
Tip:
If it is colder than 60 degrees F outside we highly recommend that you
take the time to drill small pilot holes especially if you are installing PVC
seal and the main body cracks easily at colder temperatures.

4. Next,
push a nail into each hole in the weather seal. We prefer to use color matched
Maze brand galvanized, smooth or ring shank trim nails, but a stainless steel
or 4D, (about 1-3/8” to 1-1/2” in length) galvanized box nails should work as
well. Do not use steel nails of
any type as they will rust and leave rust streak on the paint and finishes.

Photo Notes: Nails shown in photo, left to right, are:
Galvanized Brown Maze Ring Shank Nail, Galvanized White Maze Ring Shank Nail
and Stainless Steel Smooth Shank Nail. The
4D Galvanized Smooth Shank Box Nail is not pictured.
5. With
the door in the closed position, and with the help of your assistant, raise the
weather seal into position, making sure to adjust the lip of the seal so that
it presses against the face of the garage door, forming an air tight seal. The
solid PVC body of the seal should not contact the garage door.
6. Start
all of the nails across the top piece of weather seal into the door jamb, but
do not drive the nails all the way in until you have made your final
adjustments to the weather seal placement (see photo).

7. Repeat
the same process for both of the side door jamb weather seals, adjusting the weather
seal fit as you go.
8. Next
you can trim the soft vinyl flaps at a 45 degree angle in the corners for a
nice, clean-looking finish.
9. Check
the garage door operation to make sure it does not bind on the weather seal at
any point as it travels along the track.
10. Now you can drive the weather seal nails all
the way in, just be careful not to hit the door if you have it closed at this
time.
11. If you had
problems with binding before you replaced the seals, you may find that you will
need to adjust the garage door operator pressure limit settings. Refer to your garage door operator Owner’s Manual
or their website for this information.
12. Finally,
for a nice clean appearance and to seal-out the weather elements, we recommend
using a latex, silicone-based but paint-able caulk, to seal along the edge of
the weather seal and the door jamb. Be
sure to use a damp rag to wipe away any excess caulk. You can then apply touch-up paint as needed.
If you aren’t
sure what weather seal to buy at www.
stardoorparts.com, simply write us at sales@stardoorparts.com and we will
try to help and get what you what need quickly and at our low prices. Also be sure to check out our other Garage
Door DIY Articles on our website.
Monday, August 22, 2016
Helpful Tips on Hiring Home Contractor
How to Hire a Local Contractor
Whether you are looking to hire a contractor to install new rollers on your garage door or build an addition to your garage, it's important to hire a licensed contractor that is also experienced in their field. Here are some helpful tips to keep in mind:
1. In most every state it is the law that any contractor who advertises MUST be licensed, no matter the size of the job. So look and ask for a license number and check it online at your states registrar of contractors or equivalent site. Once on the site, enter the company license number. Note the name of the company (does it match the name of the company being advertised?). Also verify if they have worker’s compensation insurance. If they say they don’t, ask when you call them, who will be coming out. If it’s the name (of the individual/owner) on the license, no problem. If it is a technician, or any other name don't do business with them since said they didn’t have employees! You now know that whoever would come out to perform the work is not licensed or insured. They will say they are sub contractors but they are not. You can also look to see if they have any complaints and if their license was ever revoked or suspended and why. Stay away from any contractor which you has any unresolved matters with the state licensing agency.
2. Check the your local Better Business Bureau (BBB). Contrary to a mixed news reviews that debunked their credibility, they actually are a very credible source. They will have online reviews and records that you can search that include contractors who are not even members of the BBB. You can see how many and what type of complaints weed files and how long ago they were and what the resolution was. Make sure whoever you hire has a good rating. It takes a lot of accountability to maintain a good rating over the years.
3. Use the following web sites and look for reviews: Google and Yelp. Simply type in the company or contractor name and then add the word "reviews" to the search and you should get a list of most reviews on the web.
4. If you have several projects to do, Angie’s List is a great resource for contractors. A company can’t get on Angie’s List directly. Their clients have to refer them. This is like having a giant data base of reviews for contractors in various specialties in your area. There’s a small annual fee but worth it if you may need to do multiple searches.
Now, hopefully these tips will help you make an informed decision about any contractor or company you hire in any of the trades! Taking 15 minutes to check things out will give you a good sense of the company and could save you time and money!
Whether you are looking to hire a contractor to install new rollers on your garage door or build an addition to your garage, it's important to hire a licensed contractor that is also experienced in their field. Here are some helpful tips to keep in mind:
1. In most every state it is the law that any contractor who advertises MUST be licensed, no matter the size of the job. So look and ask for a license number and check it online at your states registrar of contractors or equivalent site. Once on the site, enter the company license number. Note the name of the company (does it match the name of the company being advertised?). Also verify if they have worker’s compensation insurance. If they say they don’t, ask when you call them, who will be coming out. If it’s the name (of the individual/owner) on the license, no problem. If it is a technician, or any other name don't do business with them since said they didn’t have employees! You now know that whoever would come out to perform the work is not licensed or insured. They will say they are sub contractors but they are not. You can also look to see if they have any complaints and if their license was ever revoked or suspended and why. Stay away from any contractor which you has any unresolved matters with the state licensing agency.
2. Check the your local Better Business Bureau (BBB). Contrary to a mixed news reviews that debunked their credibility, they actually are a very credible source. They will have online reviews and records that you can search that include contractors who are not even members of the BBB. You can see how many and what type of complaints weed files and how long ago they were and what the resolution was. Make sure whoever you hire has a good rating. It takes a lot of accountability to maintain a good rating over the years.
3. Use the following web sites and look for reviews: Google and Yelp. Simply type in the company or contractor name and then add the word "reviews" to the search and you should get a list of most reviews on the web.
4. If you have several projects to do, Angie’s List is a great resource for contractors. A company can’t get on Angie’s List directly. Their clients have to refer them. This is like having a giant data base of reviews for contractors in various specialties in your area. There’s a small annual fee but worth it if you may need to do multiple searches.
Now, hopefully these tips will help you make an informed decision about any contractor or company you hire in any of the trades! Taking 15 minutes to check things out will give you a good sense of the company and could save you time and money!
Tuesday, August 16, 2016
Check Out Our New Website!
Star Door Parts just launched a completely new and redesigned website to enhance your shopping experience. We are still the same company that you have come to trust with our outstanding customer service, fast shipping, low prices and comprehensive inventory and product selection.
While redesigning our site we listened to your feedback and worked to provide you an even better online shopping experience. Specifically changed was our mobile site. Our new site is responsive to the devise you are using which means that the website will look different on a smartphone, tablet and desktop. The navigation is now easier since the mobile site automatically adjusts the site view to your phone screen size and position held. If you still need the full features of our desktop site but are using a mobile device, simply use your browser option to Request Desktop Site from either your Safari or Chrome browser menu.
We appreciate your business and welcome any continued feedback on our website design, product offerings, blogs, etc.
The Team at Star Door Parts

https://www.stardoorparts.com/
The Team at Star Door Parts
https://www.stardoorparts.com/
Thursday, July 28, 2016
Screw Drive Garage Door Opener: Light Bulb Replacement | DoItYourself.com
Screw Drive Garage Door Opener: Light Bulb Replacement | DoItYourself.comHow to Change the Light Bulb and Lens Cover on a Garage Door Opener
It's important to change the light bulb in your garage door opener with one that is designed to work with you opener and is resistant to vibration to ensure a longer lifespan. Be cautious when using LED and CFL bulbs as they can give off interference and interfere with the operation of your remote transmitters. Read more here by clicking on the link.
It's important to change the light bulb in your garage door opener with one that is designed to work with you opener and is resistant to vibration to ensure a longer lifespan. Be cautious when using LED and CFL bulbs as they can give off interference and interfere with the operation of your remote transmitters. Read more here by clicking on the link.
Saturday, June 18, 2016
How to Replace Garage Door Rollers
Garage door
rollers or wheels can be an integral
part of how safe, smooth and quite
your garage door operates. Rollers are made in various qualities in a number of different materials and sizes to meet the effective use of the end user. Determining the
correct type of garage door rollers
for your garage door can be a little confusing, especially when you do not know
what you need to look for in a garage door roller. To simplify things, there
are a couple of primary things you
need to be aware of. First would be the actual size of the
roller, and 2nd is the purpose and
conditions you will be
operating your door in.
The material can vary on both the garage door roller itself, as well as on the stem. Each material features its own pros and cons, and knowing your own priorities, necessities, and expectations on your garage door can help you pick a wheel that will best serve you. The materials of a garage door roller can influence just how long the roller lasts, how resistant it is against high-moisture environments, how quiet the garage door will be, and how heavy of a door the roller can accommodate. Your first concern, in any situation, would be to determine a garage door roller that can accept the weight of your garage door without wearing out prematurely. The safest method to replace your garage door roller is to look at the material that your garage door rollers are currently made out of. However, if you were considering upgrading your rollers, it might be good to know the weight your garage door. Oftentimes, the weight of the door will be located on a sticker somewhere on the garage door or perhaps the spring shaft.
Roller sizes are rather standard in the garage door business. It is usually a one inch, two inch, or three inch diameter on the wheel itself. You can very easily find out this measurement by placing a ruler across the face of the roller. In addition to the diameter of the roller, you need to know the entire length of the stem itself as well. You can get that measurement by measuring the full length of the stem up to where the roller is on the stem. The measurement you will get is not always going to be an exact measurement of 1", 2", or 3" rollers. A 3" roller will typically measure out to be about 2-3/4", while a 2" roller will measure out to be a 1-3/4", and a 1" roller will measure out around 3/4". In addition, the shaft of almost every roller will be a diameter of 7/16 of an inch, which is the typical industry standard. You will likely not need to worry about that measurement unless you have a much older door. If you've got a very old door a simple quick measurement of the stem diameter using a ruler or caliper would not hurt. Knowing this measurement, you can observe what size works with you current configuration.
One of the next priorities when choosing a roller would be to determine if your garage door is in a high-moisture environment or not. Rollers made with stainless steel or zinc plating are made that way because they are resistant of rust. Under normal conditions, they are utilized in spaces like car washes, dairy barns and other high-moisture environments. If you do not have a high-moisture location, there isn't an expressed requirement for a stainless steel or zinc plated roller, but if you've had a rust problem in the past, it's probably wise that you will get rollers that are resilient against rust. An area where you may choose to use a corrosion resistant roller is in a colder climate that has snow and salt. A corrosion resistant roller will prevent the bottom rollers from rusting out and failing prematurely.
Once you have determined the environment your door operates in the next decision is between how quiet you want your garage door to be, how much money you want to invest, and how long you would like the rollers to last. If smooth quite operation is what you are looking for then a nylon or rubber roller needs to be on your list. Additionally, the number of balls in the bearing for the roller can drastically effect how loud your garage door will be. The more ball bearings inside the garage door roller there are, the quieter and smoother the garage door will run. Additionally, rollers with more ball bearings in them tend to last considerably longer than ones with fewer ball bearings. Typically the more ball bearings the more expensive the roller.
Ultimately, comprehending the cycle life of a garage door wheel is important as well to picking a garage door wheel especially in commercial applications. The ratings are fairly simple to understand. The rating for our 3” 10 ball 7” steel is as follows around 50000 cycles on a 12 foot high door at approximately 150lbs per roller. A single roller does not support the entire weight of the door, so this should not be alarming. So if we take that into perspective it means that using this particular roller on a door with ten rollers on it, the rollers could lift a 1500lb door that is 12 ft. high approximately 50,000 times before it breaks or fails. Mind you, such a door is very large, and likely is not what you have. However it gives you a glimpse into the strength of these rollers. If your rollers are too weak to lift the door, the roller will break a lot more quickly than under normal circumstances, so make sure pick something that can support the weight of the garage door.
To summarize, the pros of steel rollers are that they last longer than nylon on large applications, they handle higher loads, and they tend to be a little bit cheaper. The con is that they are much louder than nylon rollers and are much less tolerant to moisture. Nylon rollers have the benefit of smooth operation, lightweight design and quietness, but they tend to break if impacted. As for the stems, if you need rust resistance, get zinc plated or stainless steel, otherwise just regular steel will suffice. The number of ball bearings can greatly manipulate the cost, but as you add more ball bearings, the roller lasts longer and runs quieter.
The most common roller used on a residential garage door is a 7 ball bearing steel roller in a 2” diameter tire with a shaft length around 4”. These rollers are good for universal use and have a load rating of 35lbs and are good for around 10,000 cycles. You can find this style roller in many hardware or big box stores. If you are looking to upgrade to a heavy duty roller for your residential door we might recommend you upgrade to a 10 ball bearing roller which has a working load of 75lbs and cycle life doubles to nearly 20,000. If you are looking for the ultimate in maintenance free and the quietest garage door rollers for your home we would suggest the white vinyl standard 11 ball bearing roller. The rollers that we carry at Star Door Parts are of a much higher quality than what you will find at your local hardware store. You could also check with a local door dealer but we have found their selection isn't as good and door dealers are not always willing to sell retail.

When contemplating replacing worn or damaged garage door rollers as being a DIY project it is very important that you do them one-by-one to maintain the integrity of your garage door and not to comprise your safety. Always remember your bottom rollers are usually held in place by the bottom bracket or fixture. Your garage door bottom bracket typically has all the spring tension attached to it via the door lifting cables. The bottom bracket should never be removed when spring tension is live on the door. If you are not knowledgeable about this process you should contact a professional door company to complete the repairs for you.
Copyright 2016 (c) By Star Door Parts
The material can vary on both the garage door roller itself, as well as on the stem. Each material features its own pros and cons, and knowing your own priorities, necessities, and expectations on your garage door can help you pick a wheel that will best serve you. The materials of a garage door roller can influence just how long the roller lasts, how resistant it is against high-moisture environments, how quiet the garage door will be, and how heavy of a door the roller can accommodate. Your first concern, in any situation, would be to determine a garage door roller that can accept the weight of your garage door without wearing out prematurely. The safest method to replace your garage door roller is to look at the material that your garage door rollers are currently made out of. However, if you were considering upgrading your rollers, it might be good to know the weight your garage door. Oftentimes, the weight of the door will be located on a sticker somewhere on the garage door or perhaps the spring shaft.
Roller sizes are rather standard in the garage door business. It is usually a one inch, two inch, or three inch diameter on the wheel itself. You can very easily find out this measurement by placing a ruler across the face of the roller. In addition to the diameter of the roller, you need to know the entire length of the stem itself as well. You can get that measurement by measuring the full length of the stem up to where the roller is on the stem. The measurement you will get is not always going to be an exact measurement of 1", 2", or 3" rollers. A 3" roller will typically measure out to be about 2-3/4", while a 2" roller will measure out to be a 1-3/4", and a 1" roller will measure out around 3/4". In addition, the shaft of almost every roller will be a diameter of 7/16 of an inch, which is the typical industry standard. You will likely not need to worry about that measurement unless you have a much older door. If you've got a very old door a simple quick measurement of the stem diameter using a ruler or caliper would not hurt. Knowing this measurement, you can observe what size works with you current configuration.
One of the next priorities when choosing a roller would be to determine if your garage door is in a high-moisture environment or not. Rollers made with stainless steel or zinc plating are made that way because they are resistant of rust. Under normal conditions, they are utilized in spaces like car washes, dairy barns and other high-moisture environments. If you do not have a high-moisture location, there isn't an expressed requirement for a stainless steel or zinc plated roller, but if you've had a rust problem in the past, it's probably wise that you will get rollers that are resilient against rust. An area where you may choose to use a corrosion resistant roller is in a colder climate that has snow and salt. A corrosion resistant roller will prevent the bottom rollers from rusting out and failing prematurely.
Once you have determined the environment your door operates in the next decision is between how quiet you want your garage door to be, how much money you want to invest, and how long you would like the rollers to last. If smooth quite operation is what you are looking for then a nylon or rubber roller needs to be on your list. Additionally, the number of balls in the bearing for the roller can drastically effect how loud your garage door will be. The more ball bearings inside the garage door roller there are, the quieter and smoother the garage door will run. Additionally, rollers with more ball bearings in them tend to last considerably longer than ones with fewer ball bearings. Typically the more ball bearings the more expensive the roller.
Ultimately, comprehending the cycle life of a garage door wheel is important as well to picking a garage door wheel especially in commercial applications. The ratings are fairly simple to understand. The rating for our 3” 10 ball 7” steel is as follows around 50000 cycles on a 12 foot high door at approximately 150lbs per roller. A single roller does not support the entire weight of the door, so this should not be alarming. So if we take that into perspective it means that using this particular roller on a door with ten rollers on it, the rollers could lift a 1500lb door that is 12 ft. high approximately 50,000 times before it breaks or fails. Mind you, such a door is very large, and likely is not what you have. However it gives you a glimpse into the strength of these rollers. If your rollers are too weak to lift the door, the roller will break a lot more quickly than under normal circumstances, so make sure pick something that can support the weight of the garage door.
To summarize, the pros of steel rollers are that they last longer than nylon on large applications, they handle higher loads, and they tend to be a little bit cheaper. The con is that they are much louder than nylon rollers and are much less tolerant to moisture. Nylon rollers have the benefit of smooth operation, lightweight design and quietness, but they tend to break if impacted. As for the stems, if you need rust resistance, get zinc plated or stainless steel, otherwise just regular steel will suffice. The number of ball bearings can greatly manipulate the cost, but as you add more ball bearings, the roller lasts longer and runs quieter.
The most common roller used on a residential garage door is a 7 ball bearing steel roller in a 2” diameter tire with a shaft length around 4”. These rollers are good for universal use and have a load rating of 35lbs and are good for around 10,000 cycles. You can find this style roller in many hardware or big box stores. If you are looking to upgrade to a heavy duty roller for your residential door we might recommend you upgrade to a 10 ball bearing roller which has a working load of 75lbs and cycle life doubles to nearly 20,000. If you are looking for the ultimate in maintenance free and the quietest garage door rollers for your home we would suggest the white vinyl standard 11 ball bearing roller. The rollers that we carry at Star Door Parts are of a much higher quality than what you will find at your local hardware store. You could also check with a local door dealer but we have found their selection isn't as good and door dealers are not always willing to sell retail.

When contemplating replacing worn or damaged garage door rollers as being a DIY project it is very important that you do them one-by-one to maintain the integrity of your garage door and not to comprise your safety. Always remember your bottom rollers are usually held in place by the bottom bracket or fixture. Your garage door bottom bracket typically has all the spring tension attached to it via the door lifting cables. The bottom bracket should never be removed when spring tension is live on the door. If you are not knowledgeable about this process you should contact a professional door company to complete the repairs for you.
Copyright 2016 (c) By Star Door Parts
Sunday, June 5, 2016
Stanley Garage Door Opener Repair and Replacement Parts from Star Door Parts

Wednesday, June 1, 2016
To Kick-off National Garage Door Safety Month we Want to Share our Garage Safety and Secuirty Tips
One of the
top mistakes people make is leaving the garage door remote in their
vehicle. Thieves break into your car and take the remote giving them
direct access to your home. The best way to prevent this from happening
and still have easy access to your garage door opener is to simply
purchase a key-chain style remote.
Keep GPS devices stowed away when parking at shopping malls, movie theaters or sporting events. Criminals will break into your car steal your GPS and your garage door remote control and then hit the “home” button on the GPS and it leads them to your unoccupied home where they will have access for several hours while you are enjoying your entertainment. If your transmitter does get stolen be sure to immediately clear all the codes in your opener and reprogram all your remotes and keypads. This prevents that stolen device from opening your door. If you do not know how to clear your codes please contact the door opener manufacturer for assistance.
Secure your garage door emergency release mechanism by using a zip tie or product designed to prevent the “six second” break-in. Products like the no-entry latch guard are easy to install and are typically under $20 and make this break-in technique almost impossible. Criminals will use a wedge and coat hanger to grab the disconnect mechanism on your garage door opener and can be in your garage (and house if your door to your house is unlocked) in seconds.
Keep the door locked between your garage and house. We suggest using a deadbolt. Also make sure the door from the garage to your home is as sturdy as your front door. A steel door is the best and anti kick devices are also recommended. It really is not that big of an inconvenience to unlock the door when you consider the piece of mind you will have knowing your home is safe. Another helpful hint is to install a good wide-angle peephole to look into your garage from safely inside the house in case you do hear strange noises coming from your garage.
Do not make it easy on the criminals and forget to shut your door when you go to bed or leave for work. This gives them free access to anything in your garage and if they shut your door behind them plenty of time to also break into your house without being seen. There are a couple products on the market like a garage door monitor that can tell you if your garage door is open or closed from your bedside or anywhere in your home. Genie now has a garage door opener that can be fitted with a device called a closed confirm remote that will tell you if your garage door closed properly behind you.
If you do have windows in garage door or side windows in your garage be sure to get obscure glass or frosted glass to prevent thieves from looking in to see what good stuff you have to offer or more importantly if someone may be home or not. Keep expensive items like golf clubs, bikes and power tools out of site. These are items easy to sell and pawn.
Always padlock the slide lock on your door when traveling or away from your home for long periods of time. If you do not have a slide lock on your garage door they can be purchased for under $10 from a hardware store or online garage door parts retailer. This ensures no one will be able to open your garage door manually or with a remote. This will give you a piece of mind that your garage is secured while traveling. A little tip though be sure to either unplug your opener or turn the vacation switch on your wall station to prevent you from accidentally pressing the button when you return home and damage your door, opener or both due to it being locked down.
Making sure your garage door and opener are maintained properly and installed correctly is also an important part of the security of your home. The draw bar arm that connects your garage door to your door opener should be as close to vertical when the door is closed and sealing the door at the floor. This helps prevent someone from prying your garage door open. If your drawbar arm is angled it can be back driven in some cases allowing access to your door. Be sure to keep the area around your photo safety sensors clean and free from debris. This is the reason most doors do not close when you activated.
Click here to see all our safety and security products.
Thursday, May 26, 2016
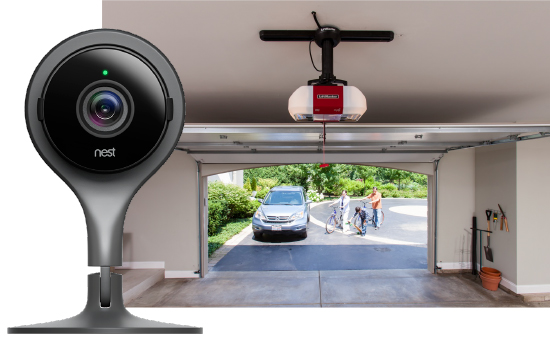
LiftMaster Now a Partner with Nest to Bring a Camera to the MyQ System
If you house is like most others, the garage is the main entrance to your home for your whole family. Users of the LiftMaster MyQ system have come to appreciate that the MyQ app (a free download at the App Store for Apple phones and at Google Play for Android phones) has always alerted
users to garage door activity via smart phone push notifications. But did you know who opened the garage door? Now that has all changed! With this new partnership, you can purchase and install a
Nest Cam in the garage and can view a live video feed from the
garage, or any other room, and receive notifications when motion is
detected, all from the MyQ app.
MyQ lets you keep an eye on coming and going activities of your home, and with the Nest Cam you can easily and conveniently see what’s happening at home when you’re not there. Through account linking MyQ and Nest Cam bring added safety, security and peace of mind to your family – from anywhere. Great for people with valuable items in the garage, families with kids who may be home alone, or those who travel frequently.
MyQ lets you keep an eye on coming and going activities of your home, and with the Nest Cam you can easily and conveniently see what’s happening at home when you’re not there. Through account linking MyQ and Nest Cam bring added safety, security and peace of mind to your family – from anywhere. Great for people with valuable items in the garage, families with kids who may be home alone, or those who travel frequently.
Sunday, May 15, 2016
How to Replace a Garage Door Opener Drive Belt
Removing the Existing Belt
1.
Begin by disconnecting the power to the garage door opener and battery back-up power
(if applicable). Caution: Failure to do
so could result in serious injury.
2.
Disengage the outer trolley by pulling the emergency release rope.
3.
Manually pull the garage door to a closed position.
4.
Relax the belt tension by loosening the outer nut on the trolley threaded rod.
5.
Remove belt cap retainer and then remove the belt from the sprocket and
trolley.
6.
Manually slide the inner trolley to the closed position until it engages the
outer trolley.
7.
Reconnect power to garage door opener.
8.
Using a remote control, run your opener until the sprocket completes a
clockwise cycle.
9.
Remove power to garage door opener before proceeding.
NOTE:
The above steps should have placed the trolley in the down position with the
door closed thereby ensuring the trolley is in the correct position for the new
belt.
Installing the New Belt
1.
Pull the belt around the pulley and towards the trolley. The ribbed side must
contact the pulley.
2.
Hook the trolley connector into the retaining slot on the trolley.
3.
Dispense the remainder of the belt along the rail towards the power head,
around the sprocket and towards the trolley.
NOTE:
Replacement belts manufactured on or after November 1, 2012 include a Spring
Retainer Plate assembly and a threaded rod attached at one end of the belt. If
you have a new design belt, please follow the instructions in the Spring
Retainer Plate section. For earlier replacement belts please follow the
instructions in the Spring Capsule section.
Spring Retainer Plate - Operators built
on or after November, 2012
1.
Remove the outer nut from the trolley threaded rod.
2.
Insert the trolley threaded shaft through the hole in the trolley. Important: Make sure that the belt is not
twisted.
3.
Install the outer nut and hand tighten.
4.
Pull the red release rope to disengage the trolley.
5.
Spin the inner nut and lock washer down the trolley threaded shaft. Use a
1/2" wrench and tighten the outer nut until the line on the spring
retainer plate is visible.
6.
Tighten inner nut to secure the adjustment.
7.
Reconnect power to your garage door opener and refer to your Owner’s manual on
how to set your model garage door opener’s travel and force adjustments
(located on the power head).
Spring Capsule – Garage door Openers
Built Before November 2012
1.
Remove from the old belt, threaded rod, spring capsule, square nut and master
link. Install only the threaded rod and master link on the new belt. If using a
D-Shape threaded shaft, make sure it is on the new belt correctly.
2.
Insert the trolley threaded shaft through the hole in the trolley. Important:
Make sure that the belt is not twisted.
3.
Place the spring, then the square shaped nut on the threaded rod and hand
tighten.
4.
Pull the red release rope to disengage the trolley.
5.
Use a 7/16” open ended wrench on the square end to tighten until spring tension
is properly set. When properly set, the
spring should measure 1-1/4" in overall length.
6.
Reconnect power to your garage door opener and refer to your Owner’s manual on
how to set your model garage door opener’s travel and force adjustments
(located on the power head).

Saturday, May 14, 2016
Need a New LiftMaster, Sears Craftsman or Chamberlain Remote?
Do you have a LiftMaster, Sears Craftsman or Chamberlain garage door opener and need to buy a new remote but not sure which one you need? All LiftMaster and Sears Craftsman garage door opener are made by the Chamberlain Corporation. These garage door openers share the same technology making the remote controls and wireless keypads interchangeable between these three brands. However, you need to know what frequency your garage door operates on in order to select the correct remote or keypad for your specific opener.
The easiest way to determine the correct replacement remote or keypad is to know your frequency. The three frequencies used since 1993 is 310, 315, and 390 MHz. If you don't know the frequency of your garage door opener you easily determine this based on the "learn" button on the power head of the opener. This button, sometimes also referred to as the "programming" or "smart" button, is usually a colored square button (but also can be a circular button on newer models). Square buttons will be green, red/orange or purple and circular buttons will be yellow.
This is an example of the purple and red/orange learn buttons:

You can determine your garage door opener's frequency based on the color of these buttons as follows:
Click here to see all the LiftMaster, Sears Craftsman and Chamberlain Remotes Sold by Star Door Parts
The easiest way to determine the correct replacement remote or keypad is to know your frequency. The three frequencies used since 1993 is 310, 315, and 390 MHz. If you don't know the frequency of your garage door opener you easily determine this based on the "learn" button on the power head of the opener. This button, sometimes also referred to as the "programming" or "smart" button, is usually a colored square button (but also can be a circular button on newer models). Square buttons will be green, red/orange or purple and circular buttons will be yellow.
This is an example of the purple and red/orange learn buttons:

You can determine your garage door opener's frequency based on the color of these buttons as follows:
- Green Square Learn Button 390MHz Billion code garage door openers made from 1993 to 1995
- Red/Orange Square Learn Button 390MHz Security+ garage door openers made from 1996 to 2005
- Purple Square Learn Button 315MHz Security+ garage door openers made from 2006 to 2014
- Yellow Round Learn Button 310, 315 and 390MHz Security+2.0™ garage door openers made from 2011 to current
Click here to see all the LiftMaster, Sears Craftsman and Chamberlain Remotes Sold by Star Door Parts
Tuesday, May 10, 2016
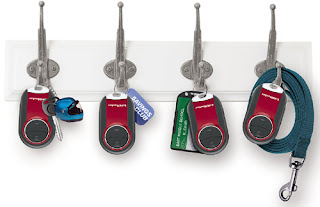
Check out the newest universal garage door opener mini remote control from LiftMaster!
The new LiftMaster
374UT Universal Mini Garage Door Opener Remote Control is portable,
compact and durable and works with most all major brands of garage door
openers. Perfect for key rings, purses and backpacks. Give one to
everyone in your house and never have to deal with the hassle of lost
keys!
Click the link below to see why everyone is talking about this new remote. Order yours today at Star Door Parts!
Click here to read more about the new LiftMaster 374UT Mini Remote

Click the link below to see why everyone is talking about this new remote. Order yours today at Star Door Parts!
Click here to read more about the new LiftMaster 374UT Mini Remote


Subscribe to:
Posts (Atom)